As an Amazon Associate I earn from qualifying purchases.
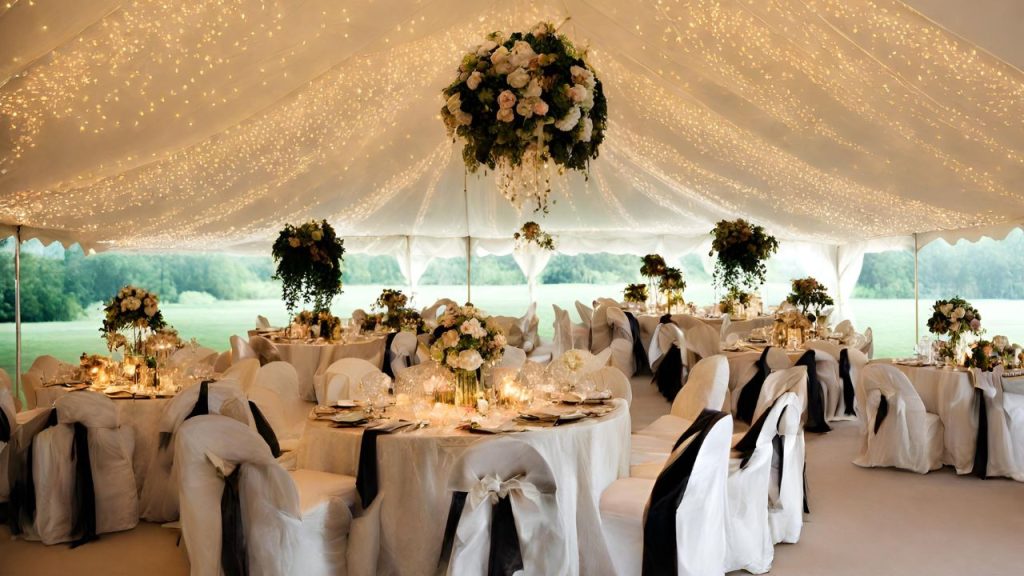
The wedding day is a magical celebration of love, and every detail contributes to the enchanting atmosphere. Among these details, wedding tent lighting plays a crucial role in setting the mood and creating an unforgettable ambiance. In this article, we’ll explore various wedding tent lighting ideas that add charm, elegance, and a touch of romance to your special day.
Your wedding day is a canvas waiting to be painted with the hues of joy and love. One element that can significantly enhance this canvas is the lighting within the wedding tent. Whether you’re planning a daytime celebration or a romantic evening affair, the right lighting can transform the atmosphere and leave a lasting impression on your guests.
Importance of Lighting in Weddings
Creating the Right Atmosphere
The importance of lighting in weddings cannot be overstated. It plays a crucial role in setting the mood for the entire event. Whether you’re aiming for a romantic, intimate feel or a lively, celebratory vibe, the right lighting can make all the difference.
Enhancing Aesthetics and Photos
Apart from creating a mood, lighting significantly enhances the overall aesthetics of the wedding venue. Well-thought-out lighting setups can highlight the decor, floral arrangements, and other details, making them more visually appealing. Plus, the right lighting ensures that your wedding photos capture the magical moments in the best possible way.
Types of Wedding Tent Lighting
1. Fairy Lights: Adding a Magical Twinkle
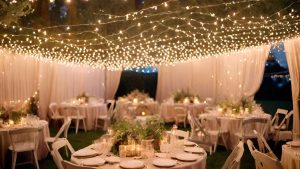
Fairy lights have become synonymous with romantic settings, and for good reason. These delicate strands of tiny, twinkling lights can be draped across the ceiling or wrapped around tent poles, creating a whimsical and dreamy atmosphere. Whether you’re going for an outdoor garden wedding or an intimate indoor affair, fairy lights add a touch of magic that captivates your guests.
Making fairy lights with a magical twinkle is a fun and creative project that can add a whimsical touch to any space. Here’s a simple guide on how to make your own fairy lights with a magical twinkle effect:
Materials:
1.String lights (LED lights work well for this project)
2.Transparent or translucent ping pong balls (one for each light)
3.A small utility knife or scissors
4.Fine sandpaper
5.Permanent markers or colored pens
6.Hot glue gun and glue sticks
7.Glitter (optional)
8.Clear sealant spray (optional)
Instructions:
1.Prepare the Ping Pong Balls:
Using a small utility knife or scissors, carefully cut a small slit in each ping pong ball. Ensure that the slit is large enough to insert the LED light but not too big.Sand the Ping Pong Balls:
Lightly sand the inside of the ping pong balls to diffuse the light and create a softer glow. This step helps to enhance the magical twinkle effect.
2.Add Color to the Ping Pong Balls:
Use permanent markers or colored pens to add a touch of color to the ping pong balls. You can create patterns, draw stars, or add swirls for a magical look. Be creative with your designs!
3.Optional: Add Glitter:
For an extra magical sparkle, you can add a bit of glitter to the ping pong balls. Apply a thin layer of glue to the surface and sprinkle glitter over it. Shake off any excess glitter.
4.Insert the Lights:
zGently insert one LED light through the slit in each ping pong ball. Make sure the lights are secure but not too tight to avoid damaging the wiring.
5.Secure the Lights with Hot Glue:
Use a hot glue gun to secure the ping pong balls to the base of each LED light. Be careful not to cover the bulb completely, as you want the light to shine through the ping pong ball.
6.Seal the Ping Pong Balls (Optional):
If you added glitter and want to protect it, or if you simply want a more finished look, you can use a clear sealant spray to coat the ping pong balls. This step is optional but can help preserve the colors and glitter.
7.Hang and Enjoy:
Hang your fairy lights in your desired space and plug them in to enjoy the magical twinkle effect. You can use them for decoration in bedrooms, living rooms, or any area that could use a touch of enchantment.
Remember to exercise caution when working with hot glue and sharp tools. Have fun creating your magical fairy lights!
2. Chandeliers: Elegant and Timeless

For a touch of timeless elegance, consider adorning your wedding tent with chandeliers. These sophisticated lighting fixtures not only provide ample illumination but also serve as exquisite decorative elements. Choose crystal chandeliers for a glamorous vibe or rustic options for a charming, countryside feel. The grandeur of chandeliers can instantly elevate the overall aesthetic of your wedding venue.
Creating an elegant and timeless chandelier involves a combination of design, materials, and craftsmanship. Here’s a step-by-step guide to help you make a beautiful chandelier:
Materials Needed:
1.Chandelier Frame:
You can purchase a pre-made chandelier frame or create your own using wire or metal rods.
Considering your preferred style, take into account the dimensions and form.
2.Lighting Elements:
Choose high-quality light fixtures or candle holders that complement the overall design.
LED candles or traditional bulbs can add different vibes.
3.Decorative Crystals or Beads:
Opt for high-quality crystals or beads for a luxurious look.
Choose crystals in various shapes and sizes for added visual interest.
4.Metallic Elements:
Brass, gold, or chrome accents can enhance the elegance.
Use metallic chains, hooks, or ornaments for additional flair.
5.Wire and Connectors:
Strong and durable wires for hanging and connecting the elements.
Ensure the wires match the overall aesthetic.
6.Ceiling Canopy:
Consider an ornate ceiling canopy to complement the chandelier’s design.
Steps to Create an Elegant and Timeless Chandelier:
1.Design Concept:
Use design software or make a paper sketch of your idea.
Consider symmetry, balance, and proportions for a timeless look.
2.Frame Construction:
If making your own frame, shape it according to your design.
Ensure it is sturdy enough to support the weight of the crystals and lighting elements.
3.Attach Lighting Elements:
Affix the light fixtures or candle holders evenly around the frame.
Ensure they are securely attached and aligned.
4.Add Crystals or Beads:
Attach crystals or beads using wire or clear nylon thread.
Create layers, starting from the outer edges and moving inward for a cascading effect.
5.Incorporate Metallic Accents:
Integrate metallic elements strategically.
Add chains, hooks, or ornaments to enhance the overall aesthetic.
6.Secure Wiring:
Conceal wires neatly along the frame.
Ensure all connections are secure and safe.
7.Ceiling Attachment:
Attach the chandelier securely to the ceiling.
Use a decorative canopy to cover any ceiling attachments.
8.Test and Adjust:
Before final installation, test the chandelier to ensure all lights are working.
Adjust the hanging length and positioning for the desired effect.
9.Finishing Touches:
Clean and polish the chandelier.
Consider adding any final embellishments or touches to enhance its elegance.
10.Installation:
Install the chandelier according to the manufacturer’s instructions or hire a professional if needed.
Remember to personalize your design to fit your taste and space. With careful attention to detail, you can create a chandelier that exudes elegance and stands the test of time.
3. Lanterns: A Charming Rustic Appeal
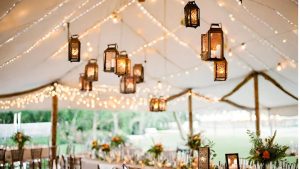
For couples seeking a rustic or bohemian vibe, lanterns are the perfect choice. Whether suspended from the ceiling or placed strategically around the tent, lanterns emit a warm and inviting glow. Opt for lanterns in various sizes and styles to create a visually dynamic setting that complements your wedding theme.
Creating charming rustic lanterns can be a delightful DIY project. Here’s a simple guide to help you make lanterns with a charming rustic appeal:
Materials Needed:
1.Mason jars or glass lanterns
2.Jute twine or rustic rope
3.Tea light candles or LED candles
4.Acrylic paint in rustic colors (optional)
5.Brushes for painting (optional)
6Sandpaper (optional)
7.Decorative elements like small pine cones, dried flowers, or burlap (optional)
8.Hot glue gun and glue sticks
Instructions:
1. Select Your Base:
Choose mason jars or glass lanterns as your base. You can find these at craft stores or repurpose old glass containers.
2. Prep the Surface (Optional):
If you want a weathered look, lightly sand the surface of the glass. This step is optional and depends on your preference for the rustic appearance.
3. Paint (Optional):
For a rustic touch, you can paint the exterior of the jars. Use earthy tones like brown, beige, or muted greens. Apply the paint unevenly for a distressed look. Let it dry completely.
4. Wrap with Jute Twine:
Take jute twine or rustic rope and wrap it around the neck or base of the jar, securing it with a knot or a dab of hot glue at the beginning and end. You can wrap it tightly or leave some spaces for a more eclectic feel.
5. Add Decorative Elements:
Enhance the rustic charm by attaching small pine cones, dried flowers, or pieces of burlap using the hot glue gun. Be creative with the placement, ensuring it complements the overall aesthetic.
6. Insert the Candle:
Place a tea light candle or LED candle inside the jar. If you’re using a real candle, make sure it’s secured in place, and consider using a flameless option for safety.
7. Create a Hanging Lantern (Optional):
To make a hanging lantern, tie a length of jute twine around the neck of the jar, creating a loop for hanging. Ensure it’s securely tied, and you can hang it indoors or outdoors.
8. Personalize (Optional):
Add a personal touch by painting initials, a rustic design, or a message on the jar. Get creative and make it uniquely yours.
9. Arrange in Sets (Optional):
Create a charming display by making multiple lanterns and arranging them in sets. They work well as centerpieces for tables or as hanging decor in your outdoor space.
10. Enjoy Your Rustic Lanterns:
Once your lanterns are complete, place them around your home or garden to enjoy the warm and rustic ambiance they create.
4. Edison Bulbs: Vintage Chic Illumination
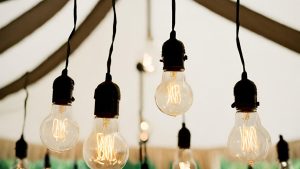
Edison bulbs exude a vintage charm that adds a touch of nostalgia to your wedding celebration. Hang them in clusters for a dramatic effect or string them across the tent for a warm, ambient glow. Edison bulbs work exceptionally well for evening receptions, creating an intimate and cozy atmosphere that encourages guests to revel in the joyous occasion.
Creating your own vintage-style Edison bulbs can be a fun and creative project. Keep in mind that working with electricity requires caution, so follow safety guidelines carefully. Here’s a simple guide to making Edison bulbs with a vintage chic illumination:
Materials:
1.Incandescent Bulbs: Choose the desired wattage and shape of incandescent bulbs. The vintage look often involves Edison-style bulbs with exposed filaments.
2.Vintage-Style Filaments: Purchase decorative vintage-style filaments that mimic the classic Edison bulb look. These are often available in specialty lighting stores or online.
3.Dimmer Switch (Optional): For added ambiance, you can use a dimmer switch. Make sure it’s compatible with the chosen bulbs.
4.Lamp Sockets: Choose lamp sockets that match the style of your bulbs. You can find sockets with a vintage aesthetic or repurpose existing fixtures.
5.Wire: Use electrical wire suitable for your project, ensuring it is rated for the wattage of the bulbs.
6.Wire Nuts: Securely connect wires using appropriate wire nuts.
7.Wire Strippers: Use wire strippers to remove insulation from the wire ends.
8.Screwdriver: A screwdriver will be necessary for connecting wires and assembling fixtures.
Instructions:
1.Safety First:
Before starting, turn off the power to the area where you’ll be working. Ensure your workspace is dry and use insulated tools.
2.Choose Bulbs and Filaments:
Select incandescent bulbs with the desired wattage and vintage-style filaments. Screw in the filaments following the manufacturer’s instructions.
3.Prepare Sockets:
If you’re using new sockets, follow the manufacturer’s instructions for assembly. If repurposing existing fixtures, ensure they are clean and in good condition.
4.Wire Connection:
Connect the wires from the socket to the electrical wires. Use wire nuts to secure the connections. Follow the color-coding standards (usually black to black, white to white, and green or bare copper to ground).
5.Secure Filaments:
Ensure that the vintage-style filaments are securely attached to the sockets. Follow any additional instructions provided by the filament manufacturer.
6.Install Bulbs:
Screw the bulbs into the sockets. Be gentle to avoid damaging the filaments.
7.Optional:
Install Dimmer Switch: If you’re using a dimmer switch, follow the manufacturer’s instructions for installation. Connect the dimmer switch between the power source and the sockets.
8.Test the Setup:
Turn on the power and test the bulbs. If using a dimmer switch, check the dimming functionality.
9.Adjust and Secure:
Make any necessary adjustments to the bulbs and filaments.Make sure every part is firmly in place.
10.Enjoy Your Vintage Chic Illumination:
Once everything is set up and secure, bask in the warm, vintage glow of your handmade Edison-style bulbs.
5. Uplighting: Setting the Mood with Color
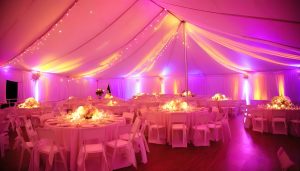
Uplighting is a versatile choice that allows you to customize the ambiance according to your wedding color palette. Strategically placed lights along the tent walls can bathe the space in a spectrum of colors, creating a visually stunning backdrop for your festivities. Uplighting not only illuminates the venue but also serves as a powerful tool for expressing the mood and theme of your wedding.
Creating uplighting to set the mood with color can be a fun and effective way to enhance the atmosphere of a space. Uplighting involves placing lights at ground level and directing them upward to illuminate walls, architectural features, or other elements in a room. Here’s a step-by-step guide on how to achieve uplighting and use it to create a mood with color:
Materials Needed:
1.Uplights: These can be LED fixtures or other types of lights designed for uplighting.
2.Extension Cords: Ensure you have enough length to reach power sources.
3.Gels or Filters: Colored gels or filters to place over the lights for the desired color effect.
4.Tape or Clips: To secure the lights and prevent tripping hazards.
Steps:
1.Choose the Desired Mood:
Before setting up your uplighting, determine the mood you want to create. Different colors evoke different emotions, so think about the atmosphere you want to achieve. For example, warm tones like red and orange can create a cozy and intimate feeling, while cool tones like blue and green can convey a calming and serene ambiance.
2.Select the Uplighting Placement:
Identify key areas in the room where uplighting will have the most impact. Common locations include corners, along walls, or behind furniture. Consider the architectural features of the space, such as columns or alcoves, which can be highlighted with uplighting.
3.Position the Uplights:
Place the uplights on the ground, ensuring they are stable and won’t be easily kicked or bumped. Angle them upward toward the target area. Experiment with the distance and angle to achieve the desired effect.
4.Secure the Lights:
To keep the lights in place, use clips or tape. Make sure the cords are safely taped down or tucked away to avoid tripping hazards. If the uplights are outdoors, ensure they are waterproof or protected from the elements.
5.Attach Colored Gels or Filters:
If you want to add color to the uplighting, attach colored gels or filters to the lights. These can be easily clipped onto the fixtures. Experiment with different colors and combinations to find the one that best suits your desired mood.
6.Test and Adjust:
Turn on the uplights and assess the effect. Make any necessary adjustments to the placement, angle, or color filters to achieve the desired mood. Consider the overall lighting in the room and adjust other light sources accordingly to complement the uplighting.
7.Combine with Other Lighting Elements:
Uplighting works well when combined with other lighting elements, such as overhead fixtures or table lamps. This creates a layered lighting scheme that adds depth and dimension to the space.
8.Enjoy the Ambiance:
Once you’re satisfied with the uplighting setup, sit back and enjoy the transformed ambiance of the space. Whether it’s a party, a romantic evening, or a relaxing environment, uplighting can enhance the mood and atmosphere of any room.
6. Candlelight: Timeless Romance
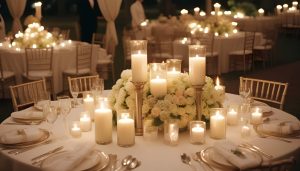
For a classic and romantic touch, consider incorporating candlelight into your wedding tent decor. Candlelit centerpieces, candelabras, or even pillar candles lining the walkways can create an intimate and timeless atmosphere. The soft flicker of candles adds a warm and inviting glow that enhances the romance of your special day.
Creating a timeless and romantic ambiance with candles is a simple yet effective way to enhance the mood. Here’s a step-by-step guide:
Materials Needed:
1.Candles: Choose candles in various sizes and shapes for a dynamic and aesthetically pleasing display. Taper candles, pillar candles, and tea lights work well.
2.Candle Holders: Use holders that match your desired style. You can go for classic glass holders, elegant candelabras, or even simple mason jars for a rustic touch.
3.Lighters or Matches: Ensure you have a safe way to light the candles.
4.Location: Decide where you want to create the romantic setting. This could be in your living room, bedroom, dining area, or even outdoors.
Steps:
Choose the Right Location:
Consider the occasion and choose a suitable location. A cozy living room, a dining table, or even a blanket fort can work well.
Select the Candles:
Mix and match candles of different sizes and shapes for visual interest. White or cream-colored candles often create a timeless and classic look.
Arrange Candle Holders:
Place candle holders strategically around the chosen area. Group them together or spread them out depending on the size of the space.
Consider Candle Colors:
While white and cream are classic choices, you can also consider using candles in soft, warm colors like blush pink or light lavender to add a romantic touch.
Mind the Scent:
Choose unscented candles or opt for a subtle and romantic fragrance. Strong scents might be overpowering in an intimate setting.
Light Candles Safely:
Be cautious when lighting the candles. Use long-reach lighters or matches to avoid accidents.
Dim the Lights:
To enhance the romantic atmosphere, dim or turn off overhead lights. Allow the soft glow of the candles to illuminate the space.
Add Other Elements:
Consider adding other romantic elements like soft music, fresh flowers, or comfortable cushions and blankets.
Create a Comfortable Seating Arrangement:
Arrange furniture or cushions in a way that encourages closeness and comfort. This could be a cozy blanket on the floor or a well-set dining table.
Enjoy the Ambiance:
Once everything is set up, take a moment to enjoy the warm and intimate atmosphere you’ve created.
DIY Wedding Tent Lighting Ideas
Creative Ways to Personalize Lighting
For couples on a budget or those who enjoy a hands-on approach, DIY wedding tent lighting offers a plethora of creative options. From crafting your own string light arrangements to repurposing everyday items into unique lighting fixtures, the possibilities are endless.
Budget-Friendly Options for a Stunning Setup
Achieving a magical atmosphere doesn’t have to break the bank. Explore budget-friendly lighting options, such as LED candles, fairy lights, or even repurposing Christmas lights. These cost-effective choices can still deliver a breathtaking effe
Tips for Perfect Wedding Tent Lighting
Considering the Venue’s Architecture
Before deciding on a lighting setup, take into account the architecture of the wedding venue. Different structures may require different approaches to lighting to highlight architectural features and create a harmonious atmosphere.
Testing the Lighting Setup Beforehand
To avoid any last-minute surprises, test your chosen lighting setup well in advance. This ensures that everything works seamlessly on the big day and gives you the opportunity to make any necessary adjustments.
Common Mistakes to Avoid
Overlooking the Importance of Dimmers
Dimmers are essential for creating a dynamic atmosphere. Overlooking their importance can result in lighting that’s too harsh or too dim. Incorporate dimmers into your setup to adjust the intensity based on the different stages of the event.
Neglecting the Impact of Different Light Temperatures
Be mindful of the color temperature of your lights. Mixing warm and cool tones can create a disjointed and unflattering look. Ensure consistency in light temperatures for a cohesive and visually pleasing ambiance.
Hiring a Professional Lighting Designer
Benefits of Seeking Professional Expertise
While DIY options are appealing, hiring a professional lighting designer brings a level of expertise that can elevate your wedding to new heights. Professionals understand how to work with different spaces and create custom lighting designs tailored to your vision.
How to Choose the Right Lighting Specialist
When choosing a lighting specialist, consider their portfolio, experience with wedding events, and client testimonials. A collaborative and communicative professional will ensure your vision comes to life seamlessly.
Lighting and Wedding Themes
Aligning Lighting with the Chosen Theme
Coordinate your lighting choices with your chosen wedding theme. Whether it’s a romantic garden party, a vintage-inspired celebration, or a modern and sleek affair, aligning lighting with the theme enhances the overall coherence of the event.
Creating a Cohesive and Visually Appealing Atmosphere
Consistency is key when it comes to lighting and wedding themes. Ensure that the lighting complements the chosen theme, creating a cohesive and visually appealing atmosphere that resonates with the overall aesthetic.
Transformative Power of Lighting
Testimonials from Couples on the Impact of Lighting
Discover firsthand accounts from couples who experienced the transformative power of lighting at their weddings. Their stories highlight the emotional impact and lasting memories created through thoughtful and intentional lighting choices.
Social Media and Wedding Lighting
Leveraging Social Platforms for Inspiration
Social media platforms are a treasure trove of wedding inspiration. Explore hashtags and accounts dedicated to wedding lighting to gather ideas and see how couples around the world have personalized their own lighting setups.
Sharing and Showcasing Personalized Lighting Setups
Once you’ve crafted your dream wedding lighting, share it on social media to inspire others. Showcase your personalized setups, share behind-the-scenes moments, and engage with the online wedding community
Addressing Common Concerns
Dealing with Weather-Related Challenges
For outdoor weddings, weather can be unpredictable. Have contingency plans in place, such as waterproofing for electrical components and alternative lighting setups in case of rain.
Ensuring Safety in Outdoor Lighting Setups
Safety should always be a top priority. Ensure that outdoor lighting setups are securely installed, away from walkways, and follow all necessary safety precautions to prevent accidents and ensure a worry-free celebration.
Case Studies
Real-Life Examples of Successful Wedding Tent Lighting
Explore real-life case studies where couples achieved stunning wedding tent lighting setups. These examples provide inspiration and practical insights into how different lighting choices can elevate the overall wedding experience.
In conclusion, the magic of wedding tent lighting lies in its ability to transform a space and create an unforgettable atmosphere. Whether you opt for the enchanting glow of string lights, the elegance of chandeliers, or the warmth of lanterns, thoughtful lighting choices can elevate your wedding day to a whole new level.
As you embark on your wedding planning journey, consider the impact that lighting can have on the overall experience. From setting the right mood to capturing breathtaking photos, wedding tent lighting is a powerful tool that should not be underestimated.
Now, armed with inspiration and practical tips, go forth and illuminate your wedding day with the magic of perfectly curated lighting.
Outdoor vs. Indoor Wedding Tent Lighting
Factors to Consider for Each Setting
The choice between outdoor and indoor wedding tent lighting depends on various factors, including the time of day, weather conditions, and the overall theme of your wedding. Indoor setups may require more focus on artificial lighting, while outdoor events can benefit from a combination of natural and artificial light.
Balancing Natural and Artificial Light
For outdoor weddings, leverage natural light during the daytime and seamlessly transition to artificial lighting as the evening unfolds. Indoor weddings, on the other hand, may require a more intricate lighting setup to compensate for the lack of natural light.
Frequently Asked Questions (FAQs)
1.Can I use LED candles for outdoor weddings?
LED candles are a great option for outdoor weddings, providing a safe and versatile lighting solution.
2.How do I choose the right color temperature for my wedding lights?
Consider the overall color scheme of your wedding and choose lighting with a temperature that complements the chosen colors.
3.Is it necessary to hire a professional lighting designer for a small wedding?
While not mandatory, a professional can bring expertise and creativity to even small wedding setups, enhancing the overall experience.
4.What’s the ideal lighting for a vintage-themed wedding?
Vintage-themed weddings can benefit from warm and soft lighting, such as string lights and antique-style lamps.
5.How can I ensure safety when using outdoor lighting?
Ensure outdoor lighting setups are securely installed, waterproofed, and follow safety guidelines to prevent accidents and ensure a worry-free celebration.
As an Amazon Associate I earn from qualifying purchases.
Reader Interactions